Categories
Health

Charlotte Tilbury Pretty Youth Glow Filter Gives You the Most Natural Glow


Following Eva Chen on Instagram is a little like enrolling in an adulting college. The only difference between a four-year university and a tap on her account’s “Follow” button is that it’s free. I’ve learned so much from tuning in to her daily diaries, and it’s all applicable to my daily life: how to pose for a mirror selfie, how to actually use a jade roller, how to distinguish a sumo orange from a heap of common citruses. No one can say that about Intro to Basketweaving.

In my favorite glimpses at her life and travels, Chen posts product-by-product makeup and skin care application stories on her account. Last season at fashion week, makeup artist Nikki Makeup joined her for a series of videos where she shared the ins and outs of perfectly-applied blush and highlighter. I foolishly forgot to write down the products they used for Chen’s glowy skin in the video, but I did remember one specific tidbit of wisdom. According to Nikki, the best blushes give you the appearance of having just come inside from a brisk walk. Translation: When applied and blended just so, blushes can give you a light, lit-from-within glow.

My prior experience with blush has come nowhere close to that precisely described look. What I wanted was the delicate flush of a Jane Austen heroine after she’s arrived at a great manor on horseback. What I often got was a garish pink or red that threw my naturally paper-white skin into sharper contrast. Granted, that’s mostly my fault. The bulk of my exposure to blush came from caking on deep pinks and orange-reds for dance performances until my mid-twenties. The look made sense under heavy stadium lighting, but it was startling and unflattering up close. Maybe my expectations were a tad dramatic, but there was nothing natural about the blushes I’d tried to wear before.

After seeing the potential for a rosy, light cheek on Chen’s Instagram, I felt compelled to give blush a second chance. I knew it would be more than re-incorporating the product back into my makeup routine, though. It’d also be a matter of tracking down a pigment that could liven my pale cheeks while avoiding clown territory. I found just that in less time than I expected, at the corner of my favorite lipstick brand, Charlotte Tilbury, and Glamour‘s latest Beauty Awards winners.

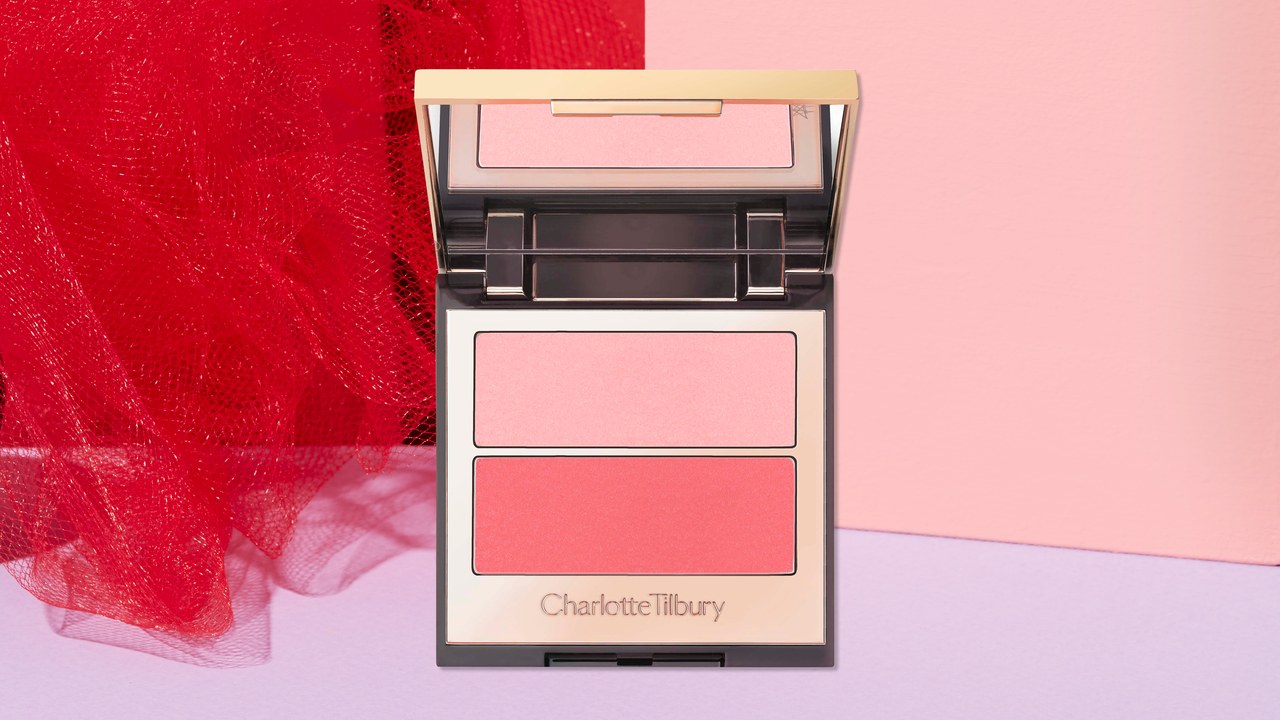
Charlotte Tilbury’s Pretty Youth Glow Filter is more low-key than its name suggests. It’s a blush-highlighter duo in two complementary, semi-sheer pink shades. There’s a natural element to the ingredients too. Instead of a powder, it’s a paraben-free cream blend. (This doesn’t mean that much for the average user, other than that it’s extra smooth to the touch and lightweight to wear.)

I followed the award-winning suggestion to try the “Pretty Fresh” shades, described online as a “coral pink” set. “Coral” sounds harsher than the blush appears. The shade looks like more light pink than pink-orange after applying. When I want the lightest of flushes, I’ll dab some of the coral color on a blush brush and swipe along my cheekbones. For days that I’d like a hint more color, I apply the blush on the apples of my cheeks with a finger before blending it with a brush.

On either occasion, my favorite part of the set is the highlighter portion. This isn’t the thousand-watt glitter bomb that you’ll find at a Fenty or an Urban Decay, but that’s why it’s great. Instead, it’s a soft gold that shines brightest under direct light. My cheeks have the slightest sparkle, but it’s not at Twilight-vampire levels.


Source link

Categories
Health

KiraKira: All About the Sparkle Filter Taking Over Your Instagram Feed


Has your Instagram feed been looking suspiciously sparklier lately? No, you’re not experiencing delayed eye damage from #SolarEclipse2017, it’s the latest video app that’s taking the fashion and beauty worlds by storm (er, sparkle). Kirakira+, an app created by Japanese developer Kentaro Yama, enhances the shine of just about any object to a hypnotizing degree. It’s so addicting it’s become its own verb around the halls of Glamour HQ: Those sequin shoes? I have to Kirakira them! I love your glitter nail polish, can I KiraKira it? (I’m not not speaking from personal experience right now.)

Immediately upon downloading the app, the world becomes your shimmering oyster again and everything in sight is a dang pearl. Because it’s practically a girl-on-girl crime to keep a secret filter this great to yourself, here’s everything you need to know about KiraKira.

1. It’s been around since 2015
While the app has only recently resurfaced on social media, it’s technically been around for a couple of years now. We can’t pinpoint exactly when or how it came back with such a vengeance, but all signs point to London Fashion Week. (See Eva Chen’s sparkly boots above.) Word of mouth too, no doubt, has helped it catch like fire among editors, bloggers, and celebrities.

2. It has seven different filters
From clean, bright sparkles to multicolored shine on a black and white background, you’ve got options when it comes to your Kirakira personality. The seven filters include Twinkle, Airly, Color, Shine, Bling-bling, Blare, and the titular Kirakira itself. Similar to Snapchat, you swipe left and right to change the filter.

3. You can adjust the intensity of sparkle
Whether you’re going for in-your-face shine or a barely detectable glimmer, the amount of sparkle you want to show is completely up to you, thanks to a toolbar in the top right corner. I find that with objects that are already pretty light-reflective (sequin clothing, metallic jewelry), it’s better to tone the filter down a bit so it’s not too overwhelming. On finer, smaller surfaces that are harder to pick up light (think glittery lipstick or nail decals) it makes a big difference to add an extra boost. Natural light also helps and is particularly helpful when you’re filming forward-facing, so, for selfies.

4. You can now take both videos and photos.
While the app previously only worked in video mode, a recent update allows you to take still images as well, with both the front camera and in selfie-mode. The photos and videos you take immediately save to your camera roll, so don’t be confused if it seems like nothing happened after you stop recording. Unlike Instagram videos, there’s no need to hold down the button when you’re recording, so it’s easier film.

5. Turn on the flash for extra shine
While it works best on light-emitting objects, adding extra light can dramatically help the app pick up more sparkles. In the top right corner, you can turn on your phone’s flash to help spotlight your objects in a lower-light settings.

6. It does cost money
But only 99 cents! And it’s worth its weight in comments. At the moment, the app is only available on Apple’s App Store.

7. Creator Kentaro Yama has two other apps
A-HDR and AHDR2, which are two photo-editing apps that let you create an HDR-like images from a single photo. While we haven’t tried these for ourselves yet (also at 99 cents each), we can imagine they’re pretty promising if they’re anything like Kirakira. Hey Eva Chen, want to check them out and let us know? Thanks in advance.

Related Stories:
Why Are My Daughter’s Beauty Apps Othering Brown Girls?
This Secret Filter Makes Your Makeup Look Great in Selfies
John Legend Posted a No-Makeup, No-Filter Photo of Chrissy Teigen, World Swoons


Source link

Categories
Health

The Most Popular Snapchat Filter Costumes for Halloween 2017


  • <img src=”https://media.glamour.com/photos/580e46a6114e233c0c9c8507/master/pass/Deer_Final.jpg” alt=”Snapchat Deer Filter How-To Tutorial”/>

    Snapchat Deer Filter How-To Tutorial

    What You’ll Need:
    Foundation
    Powder bronzer
    Loose setting powder
    White powder eyeshadow
    Brown powder eyeshadow
    Black liquid eyeliner
    White liquid eyeliner
    False eyelashes (optional)
    Deer ears

    Emily Kemp

  • <img src=”https://media.glamour.com/photos/580e41879ee18bbc22ab57f9/master/pass/0V0A8410.jpg” alt=”Step 1: Warm Up Your Complexion”/>

    Step 1: Warm Up Your Complexion

    Start with a foundation that’s one shade darker than your normal color. This might go against every piece of advice you’ve ever heard, but trust us. “You have to warm up your skin so the white pops,” says Stewart. We used Make Up For Ever Water Blend Foundation ($43). Set your foundation with a light dusting of powder and then add bronzer all over, but be sure to use a heavier hand on your forehead and cheeks.

    Emily Kemp

  • <img src=”https://media.glamour.com/photos/580e41899ee18bbc22ab57fa/master/pass/0V0A8414.jpg” alt=”Step 2: Light Up Your Eyes”/>

    Step 2: Light Up Your Eyes

    Next, apply white eyeshadow on your upper and lower eyelids. Don’t be afraid to bring it underneath—this part is crucial in achieving that “doe-eyed” effect. Dust a warm brown eyeshadow in the crease for contrast. Our favorite under $1 option: Wet n Wild Color Icon Eyeshadow in Sugar ($0.99).

    Emily Kemp

  • <img src=”https://media.glamour.com/photos/580e418a8bd9950546d001fb/master/pass/0V0A8420.jpg” alt=”Step 3: Outline Eyes and Nose”/>

    Step 3: Outline Eyes and Nose

    Create a sideways V shape on your eyes using a black liquid liner. The first step in nailing this: Draw on a regular cat eye wing. Then extend the line down to the center of your eye and accentuate it by adding more white shadow to your inner corners. After that, act like you’re about to contour your nose, except don’t blend it in. Starting under your brow bone, take a brown eyeliner and trace the sides of your nose. Set it with brown powder eyeshadow. Black and brown liners we love: Make Up For Ever Kohl Pencil in 9K ($18) and Revlon Colorstay Liquid Eye Pen ($8.50).

    Emily Kemp

  • <img src=”https://media.glamour.com/photos/580e418a114e233c0c9c8501/master/pass/0V0A8429.jpg” alt=”Step 4: Add Dots and Fill in Nose”/>

    Step 4: Add Dots and Fill in Nose

    Using more white shadow, highlight above your brow bone and down the center of your nose. Then, take your white liquid liner and draw little U shapes on your cheekbones—leave them open in the center so you can fill them in with a white eyeliner pencil. It’ll give the spots more dimension. Lastly, the nose! With black liquid liner, draw a letter “M” on the tip of your nose and fill it in. The points of the “M” should match up to where your nose contour ends. Pro tip: Color the insides of your nostrils; it’ll look more realistic.

    Emily Kemp

  • <img src=”https://media.glamour.com/photos/580e44f1fa71013257a91818/master/pass/snapchat-deer-halloween-makeup.jpg” alt=”Step 5: Add Antlers”/>

    Step 5: Add Antlers

    Throw on some deer antlers (we got ours at Spirit Halloween), and you’re done.

    Emily Kemp

  • <img src=”https://media.glamour.com/photos/580f86712458424d1bc75891/master/pass/Deer_Grid-final.jpg” alt=”Pin this for later!”/>

    Pin this for later!

    Emily Kemp

  • <img src=”https://media.glamour.com/photos/580e44f8fa71013257a91819/master/pass/snapchat-goddess-halloween-makeup.jpg” alt=”Snapchat Butterfly Filter How-To Tutorial”/>

    Snapchat Butterfly Filter How-To Tutorial

    What You’ll Need:
    Foundation
    Loose setting powder
    Gold highlighter
    Gold eyeshadow
    Gold pencil eyeliner
    Gold glitter
    Warm brown eyeshadow
    Black liquid eyeliner
    False eyelashes (optional)
    Gold lip gloss
    Gold or yellow butterflies

    Emily Kemp

  • <img src=”https://media.glamour.com/photos/580e42007a52574c7ef91078/master/pass/0V0A8242.jpg” alt=”Step 1: Perfect Your Base”/>

    Step 1: Perfect Your Base

    This step is all about creating a flawless, goddess-like complexion. After creating a smooth base with foundation, set it with a loose finishing powder, like Make Up For Ever Super Matte Loose Finishing Powder ($29).

    Emily Kemp

  • <img src=”https://media.glamour.com/photos/580e42007cbc533f7e7eae1a/master/pass/0V0A8245.jpg” alt=”Step 2: Highlight Everywhere”/>

    Step 2: Highlight Everywhere

    Now, go HAM with gold highlighter and eyeshadow. Put it everywhere—on your eyelids, in the inner corners, on your cheekbones, down the bridge of your nose, on your forehead, cupid’s bow, chin, lips—everywhere. Shades we love: Make Up For Ever Pro Light Fusion Highlighter ($39) and Kat Von D Metal Crush Eyeshadow in Thrasher ($21).

    Emily Kemp

  • <img src=”https://media.glamour.com/photos/580e42018bd9950546d001fd/master/pass/0V0A8260.jpg” alt=”Step 3: Add Black Liner”/>

    Step 3: Add Black Liner

    Swipe on warm brown eyeshadow in your crease for extra intensity. Then create a cat eye using an intense black liner. To warm up your cheeks even more, dust on a coral-pink blush with a fluffy brush. The perfect shade that works on all skin tones: Nars Powder Blush in Orgasm ($30).

    Emily Kemp

  • <img src=”https://media.glamour.com/photos/580e42017cbc533f7e7eae1b/master/pass/0V0A8267.jpg” alt=”Step 4: Trace on Gold Eyeliner”/>

    Step 4: Trace on Gold Eyeliner

    Finish off your eyes with more sparkle: Gold eyeliner in the waterline. We love NYX Jumbo Eye Pencil in Cashmere ($4.49).

    Emily Kemp

  • <img src=”https://media.glamour.com/photos/580e45807a52574c7ef9107d/master/pass/0V0A8280.jpg” alt=”Step 5: Sprinkle on Glitter “/>

    Step 5: Sprinkle on Glitter

    Okay, this is where it gets crazy. You should probably go into the bathroom for this step if you can, because you’re about to make a mess. Wet a flat, synthetic brush and dip it in your gold glitter. Pat it on gently. Fallout is inevitable, but try to limit it by keeping your brush wet at all times. Sprinkle any remaining bits in your hair as desired (like so), and add butterfly decals. Your glitter survival guide: Benefit Cosmetics Foundation Brush ($24), Make Up For Ever Mist + Fix Setting Spray ($30), and Make Up For Ever Glitter in Gold ($15)

    Emily Kemp

  • <img src=”https://media.glamour.com/photos/580f86724de307625884e561/master/pass/Butterfly_Grid-final.jpg” alt=”Pin this for later!”/>

    Pin this for later!

    Emily Kemp

  • <img src=”https://media.glamour.com/photos/580e453d7a52574c7ef9107c/master/pass/snapchat-dog-halloween-makeup-2.jpg” alt=”Snapchat Dog Filter How-To Tutorial”/>

    Snapchat Dog Filter How-To Tutorial

    What You’ll Need:
    Foundation
    Contour palette
    Highlighter
    Pressed powder
    Bronzer
    Brown eyeshadow stick
    Cool brown powder eyeshadow
    Brown eyeliner pencil
    White eyeliner pencil
    Black liquid eyeliner
    Dog ears

    Emily Kemp

  • <img src=”https://media.glamour.com/photos/580e4228fa71013257a91816/master/pass/0V0A8352.jpg” alt=”Step 1: Contour “/>

    Step 1: Contour

    The easiest way to chisel your cheekbones like the filter? Dust a taupe-colored powder in the hollows of your cheeks with a fluffy brush. Our favorite contouring powders: Anastasia Beverly Hills Contour Kit ($40) and Rimmel London Kate Sculpting Palette ($6.49).

    Emily Kemp

  • <img src=”https://media.glamour.com/photos/580e4228fa71013257a91815/master/pass/0V0A8358.jpg” alt=”Step 2: Do a Smoky Eye”/>

    Step 2: Do a Smoky Eye

    For that diffused smoky eye look, apply a cool brown eyeshadow stick all over your eyelids and your waterline and blend it out with your fingers. The cream shadow will also act as your base—and won’t budge all night. Set it with a matching brown shadow, and don’t forget to bring the color underneath your eyes, too. Then do a coat of mascara or apply false lashes. Your smoky eye tool-kit: Clinique Chubby Stick Shadow Tint for Eyes in Fuller Fudge ($17), Make Up For Ever Artist Shadow in ME554 ($21), and L’Oréal Voluminous Feline Mascara ($7.99).

    Emily Kemp

  • <img src=”https://media.glamour.com/photos/580e42297a52574c7ef91079/master/pass/0V0A8367.jpg” alt=”Step 3: Outline Nose”/>

    Step 3: Outline Nose

    To create the nose, work in two sections. First, trace the outline (an upside down heart) with a brown kohl pencil in the center of your face. Then, draw an upside down “U” shape (what will become the nostrils and snout) on your actual nose. With black liner, draw circular nostrils and a vertical line right above your own.

    Emily Kemp

  • <img src=”https://media.glamour.com/photos/580e42297cbc533f7e7eae1c/master/pass/0V0A8378.jpg” alt=”Step 4: Shade Nose”/>

    Step 4: Shade Nose

    With brown liner and a light touch, shade in the nose. Move around any spotty or uneven color and blend with a small, flat eyeshadow brush. Do the same on the inner portion of the nose, but add a white circle to the very center to create dimension. Ain’t got time for all that? Throw on a fake dog nose and be done in less than five seconds.

    Emily Kemp

  • <img src=”https://media.glamour.com/photos/580e46b2fa71013257a9181c/master/pass/Dog_final.jpg” alt=”Step 5: Add Finishing Touches”/>

    Step 5: Add Finishing Touches

    Add white eyeshadow to the outer portion of the nose for even more dimension. Go in and re-trace any dull lines if necessary, and perfect and set the nostrils with black eyeshadow. Finish it off by drawing on tiny polka dots with the sharp tip of your liquid liner. And don’t forget to set the whole thing with finishing powder—the last thing you want is for it all to melt off. Add your dog ears (options here!), and you’re all set to beg for treats.

    Emily Kemp

  • <img src=”https://media.glamour.com/photos/580f86732458424d1bc75892/master/pass/Dog_Grid-final.jpg” alt=”Pin this for later!”/>

    Pin this for later!

    Emily Kemp

  • <img src=”https://media.glamour.com/photos/580e4a739ee18bbc22ab57ff/master/pass/Rainbow_final-2.jpg” alt=”Snapchat Rainbow Filter How-To Tutorial”/>

    Snapchat Rainbow Filter How-To Tutorial

    What You’ll Need:
    Foundation
    Contour palette
    Highlighter
    A pinkish-red blush
    White pencil eyeliner
    White liquid eyeliner
    Black gel eyeliner
    Mascara
    Rainbow-colored face paint (or cream eyeshadow)

    Emily Kemp

  • <img src=”https://media.glamour.com/photos/580e4268fa71013257a91817/master/pass/0V0A8304.jpg” alt=”Step 1: Even Out Skin Tone”/>

    Step 1: Even Out Skin Tone

    The main focus of this look is (obviously) the rainbow barf, so in an effort to keep everything else simple, even out your skin with foundation and matte it down with translucent powder. Must-have base basics: CoverGirl Clean Liquid Foundation ($6.99), It Cosmetics Bye Bye Undereye ($24), and Laura Mercier Translucent Loose Setting Powder ($23).

    Emily Kemp

  • <img src=”https://media.glamour.com/photos/580e42688bd9950546d001ff/master/pass/0V0A8309.jpg” alt=”Step 2: Add Blush and Create Doll Eyes”/>

    Step 2: Add Blush and Create Doll Eyes

    For that doll-like effect (and to make your eyes appear way bigger) line your lower waterline with white pencil. Then, do reverse eyeliner stacking by adding black liner underneath. Follow it with a swipe of mascara, and add a pop of reddish-pink blush on the apples of your cheeks to bring life to the look. Our favorite white liners: Make Up For Ever Aqua XL Eye Pencil in M16 ($21) and Stila Stay All Day Waterproof Liquid Eyeliner ($22).

    Emily Kemp

  • <img src=”https://media.glamour.com/photos/580e426a8bd9950546d00200/master/pass/0V0A8323.jpg” alt=”Step 3: Apply Rainbow Face Paint”/>

    Step 3: Apply Rainbow Face Paint

    With a thick, flat synthetic brush, paint centimeter-long rainbow stripes from your lips down your neck; ending in the center of your throat. Start on the opposite side of your dominant hand (so if you’re a righty, start on the left side of your mouth; if you’re a lefty, on the right—this is so you don’t accidentally smudge the lines). No-fail face paint: Make Up For Ever Flash Color Multi-Use Cream Color Palette ($99).

    Emily Kemp

  • <img src=”https://media.glamour.com/photos/580e454ffa71013257a9181a/master/pass/snapchat-rainbow-halloween-makeup.jpg” alt=”Step 4: Add Little White Stars”/>

    Step 4: Add Little White Stars

    After letting your rainbow face paint set for 10 minutes, it’s time to add the finishing touch—little white stars. With white liquid liner, paint on little asterisks (or dots—either option works!) and let set. Boom. That’s it. And think, you don’t even need to change your outfit.

    Emily Kemp

  • <img src=”https://media.glamour.com/photos/580f8673c677ebb434c491a7/master/pass/Rainbow_grid-final.jpg” alt=”Pin this for later!”/>

    Pin this for later!

    Emily Kemp


  • Source link

    Categories
    Health

    Chrissy Teigen's No-Makeup Selfie Needs 'No Filter Necessary'


    The sun shines, and Chrissy Teigen continues to be a bright spot on social media. The model and author has a voice entirely her own on Twitter and Instagram, and you could compare her updates to little pebbles of joy you collect and cherish during the times when social media takes a dark turn (as it’s wont to do these days). And when her husband, John Legend, gets in the mix, only good things ensue.

    For example, there was that time Teigen and Legend prom-ified a movie night, complete with a homemade corsage and the quintessential prom pose photos. They’re like that couple that’s revoltingly cute, but just funny and self-aware enough about it that you want to third-wheel every date. And it’s not all jokes and faux Twitter feuds: Legend just posted a no-filter, barefaced photo of Teigen to Instagram, and his caption will yet again make your heart melt.

    The two are currently vacationing in the Mediterranean, and yesterday Legend snapped a shot of Teigen and commented, “No filter necessary.” The man’s not wrong; Teigen is giving off a rosy glow. I mean, that skin! The photo takes on added significance when you consider what’s been going down with the star lately: as an avid social media user, Teigen’s recently opened up about the stress the platforms bring, saying that Instagram often makes her feel “insanely inadequate.”

    Add in discovering an entire online forum created to hate on her, and it’s admirable that Teigen has the grit to continue standing up to trolls and mommy-shamers alike. So, this makes yesterday’s peaceful Instagram all the more impressive.

    Even with the naysayers, the two appreciate Teigen as is. No makeup, period zits and all.

    Related Stories:
    Chrissy Teigen Just Broke the Curse of Plastic-Surgery-Denying Stars: “Everything About Me Is Fake Except My Cheeks”
    Gabrielle Union Just Celebrated Her Freckled Skin With a No-Makeup Selfie
    Bless Chrissy Teigen for Baring Her Stretch Marks (Again) to the Whole World


    Source link